CLICK HERE FOR FREE BLOGGER TEMPLATES, LINK BUTTONS AND MORE! »

Tuesday, November 30, 2010

Christmas Chocolate

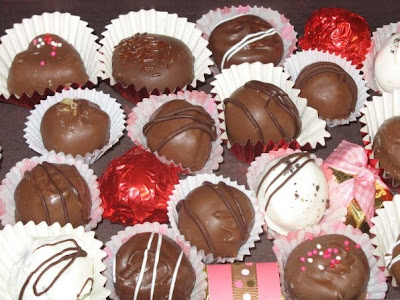
The Sweet Shoppe is opening for an exclusive offer!
Holiday Chocolate!!

Pre order now!
2 sizes available this year:
1 lb box $18.00
5 piece mini box $5.00
(perfect teacher gift!)

The boxes are gold with clear lids and will be finished
off with a red bow.

This year the variety will include (bot not necessarily limited to):

Milk chocolate truffles, mint truffles, dipped caramels,
peanut butter crisps, and dark chocolate butter creams.

Email your orders to:

taijastagg@att.net


Friday, October 29, 2010

Birthday Cakes

This cake was made to celebrate a 75th Birthday.
I love the fall theme!
The top cake is double chocolate with chocolate mousse filling.
The cupcake flavors are chocolate chip pumpkin with cream cheese frosting,
and strawberry cheescake.
All the flower and leaf decorations are handmade from gumpaste


This is Miss Molly's first birthday cake.
She is lovingly known as "little monkey girl" to her
family. So she HAD to have a monkey princess on her cake.
The CHP department (Her daddies work) sure enjoyed
the leftovers of this cake!


A Little Cookie Fun

I Can't believe I'm going to say this...
But I think I'm totally sold on royal frosting now.
I don't even mind the taste if I add some favorite flavorings to it!
There is just SO MUCH more I can do with it.
So sorry buttercream, I will use you when taste is
what matters most.

These cookies were for my sons football team. He's the Raiders this year.
My son wanted it to be made perfectly clear that he is NOT a Raiders fan... it's just
his team name. Does that hurt team moral?
The boys were cute, some said they were going to keep it forever... that idea lasted about
27 seconds...maybe.
They are decorated with royal icing. The faces are handpainted with a wee tiny brush and food dye.


I was giddy when someone asked for baby girl cookies. My FAVORITE!!

These baby cookies are made with buttercream frosting.

These sweet little candy corn princesses were made for
my daughters dance class. This was one of those projects that
I have been obsessing about ever since I saw a princess
sugar cookie. I just HAD to try them.
They are decorated with royal icing and edible glitter, so fun!


Monday, October 18, 2010

She Has A Name! Or Two... Or Three

Wow!! Thanks SOOO much for all of your awesome name suggestions!
There were so many, chosing a name was difficult!
The girls and I loved all of your creative ideas!!

There were 3 names the girls were head over heals for.... So, we decided she could have
more than one name!

From this day hence she shall be known as.... (drum roll please)
Penelope Wanda Glindora
Congratulations to the Winners:
Cassie from Tiaras and T-Tops for suggesting Penelope
Settee from Misguided Maiden for suggesting Wanda
Sara H for suggesting Wanda
Tami from Tomato and Tordle for suggesting Glindora
I will be sending each of you a dozen Halloween sugar cookies! Watch for them in your mail boxes by the weeks end.

Tuesday, October 12, 2010

Halloween Table Scape

One of my favorite blogs, The Stories of A to Z, is having a fun linky party!
It's all about Halloween mantel/shelf/table top scapes!
Check out the party for tons of fun decorating ideas!
I don't have a mantel, so I am posting our living room buffet.
The pumpkins on the top shelf were first posted here. Check it
out to see how they were made.
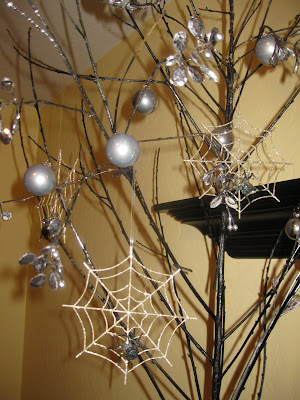
I love the creepy elegance of this silver and black tree.

I have been seeing "31" decor items all over and I love them! So I had to jump on board.
And of course Miss Witchy, who shall remain nameless until Monday. If you'd like to know more about her and the contest/giveaway go here.

I made the candleabra sign with some vinyl I scored on clearance at Target.
The candles have vinyl stickers as well.

And this little cutie is a free printable from House of Smith's.
I spend a lot of time not knowing what to do with this space in my house. For now I am happy with it!


Wednesday, October 6, 2010

A BeWitching Extreme Makeover And A Chance To Win


During a recent trip to one of my favorite thrift shops I found this

little beauty. She cost $12.00.

She's not really my style though...


Makeover time!


I started with a nose job, then a chin job.


Then she got a whole new face job. Complete with wrinkles and hag lines.

I used polymer clay. Her head comes off, creepy, I know. But it worked well for

baking her new face in the oven. Her golden curls didn't melt, but it wouldn't have mattered if they did...


I painted her new face with craft paint. I had her much more haggish at first, but my girls weren't going for it, so she got another mini makeover.


New clothes... new hair... new blingy jewelry...


Ta-da!

Meet our little witchy.


The hat came from the dollar bins at Target.

Her long locks are an old Halloween wig.


I sewed her a chic new ensemble.

This fun glam spider came from a thrift shop.


Her shoes are adorned with rhinestone earrings.


More rhinestone jewelry. There is no such thing

as too much of that!


So here is where YOU come in!!

She needs a name. We are a little stumped.

So if you'd like a chance to win 1 dozen of these Halloween cuties, made by yours truly,

leave a comment with a name suggestion.


The judges will be my very own enchantresses, ages 9 and 5.

They will choose a name on Monday October 18th!

Good luck, enter as many names as you'd like!


Monday, September 27, 2010

Wooden Memory Pumpkins


This year I wanted to use some of our favorite Halloween pictures to
decorate with. My 5 year old helped me go through boxes of old photos and pull out ALL the Halloween pictures. Then they sat around in a pile for DAYS while I tried to figure out how to use them.
I had so many favorites it was REALLY hard to choose!

While working on another project (mod podging pictures to 2 x 6 blocks)
This idea was born.

So I turned a bunch of various sized 2 x 6 into pumpkins.

Nothing fussy, just cut a variety of lengths, I didn't even measure!
Paint, sand, and antique the blocks.
Use mod podge to adhere the pictures to the blocks. On a few of them I added some scrapbook paper frames.
Mod podge over the top of the pictures too.

I found a good chunky branch and cut it into a variety of lengths for stems.
Glue the stems on top with hot glue or gorilla glue.
I tied a bow and glued on some silk leaves and berries.

We ALL have loved having our favorite old pics on display!

I'm linking up with:

Sunday, September 12, 2010

My New Favorite Breakfast Roll

These are orange cream cheese rolls. Perfect for a special morning.

And SO good! The dough has sour cream in it, so it is tender and moist. The filling is good stuff like cream cheese and sugar with orange zest. There is supposed to be a glaze on top of these but unfortunately my pantry lacked powdered sugar on this day (gasp) but they are still just so. so. good.

I got the original recipe here, at Cooks.com
I tweaked a few things though.
I made the dough according to the recipe directions.
But instead of doing the braid I made more of a sweet roll shape.
Roll all the dough out into a large rectangle shape.
The filling is the same except for I added the zest of one orange.
Slather that goodness all over the dough.

Roll it up and pinch the end closed

I use a long piece of thread to cut each roll.
Place them on a cookie sheet 2 inches apart and let rise until double in size.
Bake at 350 for about 18 minutes. Until nice and golden, but don't over bake, you know the rules.

If I had made the glaze I would have followed the recipe, making these changes:
Use juice from the orange you zested instead of milk, and about 1 tsp orange zest.




Tuesday, September 7, 2010

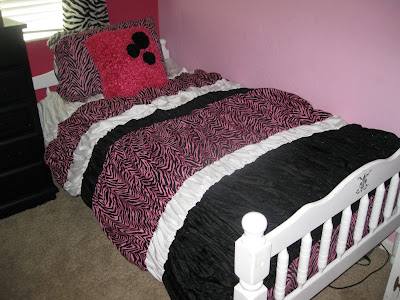
Ruffly Duvet Tutorial

As promised here is a closer look at these ruffly duvet covers.

The old comforters looked like this, they don't exactly go with the new
decor and we couldn't find one we liked that fit the budget. (The very small budget)

AND when Beth over at the Stories of A-Z posted her new anthropology duvet cover, here, I was in love!

Two BIG problems though. Anthropology doesn't make this cutie in zebra stripes and it was not in the budget.
So I decided to take a crack at re-creating one.
I gathered fabric. For this project I needed lots of big wide pieces of fabric so I used mostly sheets from Ross. The black fabric I found on the bargain table at Jo Ann's.
I measured the width of the old comforter and cut my fabric strips twice as long, so there would be lots of ruffly gathers. All of the strips needed to be pieced together to be long enough.
To determine the length I measured how long the old comforter was and randomly chose lengths for each strip until they equalled the length of the comforter. uh... that's confusing. It went something like this:
Old comforter = 84 inches long
White strip #1 = 18" wide
black strip #1 = 6" wide
zebra #1 = 24" wide
white strip #2 = 5" wide
black strip #2 = 13'" wide
zebra strip #2 = 10" wide
White strip #3 = 8' wide
Total = 84 inches

I then added 1 inch to the width of each strip for seam allowance.
Next sew a gathering stitch along both the top and bottom of each strip.
*Hint: This project takes a TON of thread so I used colors I already had that I didn't have plans for. I stopped sewing and made a break mid way across each strip, to make gathering easier.

Pull up the bobbin thread to form gathers

Then measure the top and bottom of each strip and adjusted the gathers to just the right width.
I got out Stanley (my tape measure) for this because he's long enough and holds nice and still.

With right sides together sew each strip together until you have something like this.

We thought this ruffly couture could even pass as an elegant frock!

Now for the back. I purchased a solid black flat twin sheet from Wal-Mart for less than $4.00.
Cut it to exactly the same size as the ruffly top and sewed them right sides together, around all four sides. I left a 24 inch opening on one of the long sides so I could turn it right side out.

Now for the old comforter.

I sewed a 3/4" button on all four corners

Then sewed elastic loops on the corners of the duvet cover. You want the loops to fit the buttons nice and snug so sew them a little smaller than the buttons.

Slide the buttons inside the elastic loops.

Then turn it right side out.

I don't plan on taking the cover off to wash it so I whip stitched the opening closed.
If you do need to be able to take it off you could definitely make a zipper or button closure.
And there you have it! It's ruffly, fluffy and so cozy!
I spent $22.00 to make each one.