CLICK HERE FOR FREE BLOGGER TEMPLATES, LINK BUTTONS AND MORE! »

Monday, September 27, 2010

Wooden Memory Pumpkins


This year I wanted to use some of our favorite Halloween pictures to
decorate with. My 5 year old helped me go through boxes of old photos and pull out ALL the Halloween pictures. Then they sat around in a pile for DAYS while I tried to figure out how to use them.
I had so many favorites it was REALLY hard to choose!

While working on another project (mod podging pictures to 2 x 6 blocks)
This idea was born.

So I turned a bunch of various sized 2 x 6 into pumpkins.

Nothing fussy, just cut a variety of lengths, I didn't even measure!
Paint, sand, and antique the blocks.
Use mod podge to adhere the pictures to the blocks. On a few of them I added some scrapbook paper frames.
Mod podge over the top of the pictures too.

I found a good chunky branch and cut it into a variety of lengths for stems.
Glue the stems on top with hot glue or gorilla glue.
I tied a bow and glued on some silk leaves and berries.

We ALL have loved having our favorite old pics on display!

I'm linking up with:

Sunday, September 12, 2010

My New Favorite Breakfast Roll

These are orange cream cheese rolls. Perfect for a special morning.

And SO good! The dough has sour cream in it, so it is tender and moist. The filling is good stuff like cream cheese and sugar with orange zest. There is supposed to be a glaze on top of these but unfortunately my pantry lacked powdered sugar on this day (gasp) but they are still just so. so. good.

I got the original recipe here, at Cooks.com
I tweaked a few things though.
I made the dough according to the recipe directions.
But instead of doing the braid I made more of a sweet roll shape.
Roll all the dough out into a large rectangle shape.
The filling is the same except for I added the zest of one orange.
Slather that goodness all over the dough.

Roll it up and pinch the end closed

I use a long piece of thread to cut each roll.
Place them on a cookie sheet 2 inches apart and let rise until double in size.
Bake at 350 for about 18 minutes. Until nice and golden, but don't over bake, you know the rules.

If I had made the glaze I would have followed the recipe, making these changes:
Use juice from the orange you zested instead of milk, and about 1 tsp orange zest.


Tuesday, September 7, 2010

Ruffly Duvet Tutorial

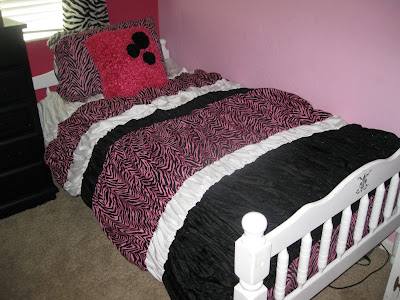
As promised here is a closer look at these ruffly duvet covers.

The old comforters looked like this, they don't exactly go with the new
decor and we couldn't find one we liked that fit the budget. (The very small budget)

AND when Beth over at the Stories of A-Z posted her new anthropology duvet cover, here, I was in love!

Two BIG problems though. Anthropology doesn't make this cutie in zebra stripes and it was not in the budget.
So I decided to take a crack at re-creating one.
I gathered fabric. For this project I needed lots of big wide pieces of fabric so I used mostly sheets from Ross. The black fabric I found on the bargain table at Jo Ann's.
I measured the width of the old comforter and cut my fabric strips twice as long, so there would be lots of ruffly gathers. All of the strips needed to be pieced together to be long enough.
To determine the length I measured how long the old comforter was and randomly chose lengths for each strip until they equalled the length of the comforter. uh... that's confusing. It went something like this:
Old comforter = 84 inches long
White strip #1 = 18" wide
black strip #1 = 6" wide
zebra #1 = 24" wide
white strip #2 = 5" wide
black strip #2 = 13'" wide
zebra strip #2 = 10" wide
White strip #3 = 8' wide
Total = 84 inches

I then added 1 inch to the width of each strip for seam allowance.
Next sew a gathering stitch along both the top and bottom of each strip.
*Hint: This project takes a TON of thread so I used colors I already had that I didn't have plans for. I stopped sewing and made a break mid way across each strip, to make gathering easier.

Pull up the bobbin thread to form gathers

Then measure the top and bottom of each strip and adjusted the gathers to just the right width.
I got out Stanley (my tape measure) for this because he's long enough and holds nice and still.

With right sides together sew each strip together until you have something like this.

We thought this ruffly couture could even pass as an elegant frock!

Now for the back. I purchased a solid black flat twin sheet from Wal-Mart for less than $4.00.
Cut it to exactly the same size as the ruffly top and sewed them right sides together, around all four sides. I left a 24 inch opening on one of the long sides so I could turn it right side out.

Now for the old comforter.

I sewed a 3/4" button on all four corners

Then sewed elastic loops on the corners of the duvet cover. You want the loops to fit the buttons nice and snug so sew them a little smaller than the buttons.

Slide the buttons inside the elastic loops.

Then turn it right side out.

I don't plan on taking the cover off to wash it so I whip stitched the opening closed.
If you do need to be able to take it off you could definitely make a zipper or button closure.
And there you have it! It's ruffly, fluffy and so cozy!
I spent $22.00 to make each one.


Monday, September 6, 2010

I Just Can't Wait ANY Longer!

The girls room isn't completely finished, but I can't wait
to show you how it's coming!

First
Here's a quick peak at what it used to look like:


Always a mess, no where to put anything... kinda cute, but always a mess.
I took the stained dresser out of their room (I'm saving it for a future project) and painted the red one black.

While we were painting the walls and un-bunking the beds we used the living room as a storage room. Thank goodness for an extra place to stash stuff!
Eek! How embarrassing! I'm so sorry to everyone who saw my house looking like this!

After MANY weeks of hard work... here is what we have so far:

Sorry about the glare from the sun... I am not a photographer.

The bedspreads are more like duvet covers. I took the old comforters and made a new cover for them... more about these in a future post.

I added some felt flowers to pillows we purchased at Ross.

I wanted the art in their rooms to be super chic. I painted black frames right
on the wall, taped a picture of each girl inside the frame and held it in place with Plexiglas, tacked down by decorative nails. I finished off the look with fabric flowers hot glued
to the Plexiglas.

I painted each girls name above their picture, making sure to add lots of swirlies.
(I thought my daughter would LOVE this, instead she asked if I was running out of paint when I did the swirls)


Tissue paper pom poms... I've never met one I didn't like!

And now for.........


THE CLOSET!


I'm super excited about this part!
I know, the green buckets aren't working very good...

My dad helped with the built-in. I drew a picture... with crayons... and he made it happen!
I have to admit that my dad has never lost his super hero cape. He can do ANYTHING!
The mirrored doors were a little bit of a challenge. Good thing dad knows his way around a router.


Behind the doors lies the girls' clothes, in buckets.

Sign above the closet.


More black scroll lines.

Ooooh, I almost forgot about the black chandy. No chic girly room is complete without one!

And with that begins the list of projects that still need to be finished......
nothing major.... just....

The ceiling needs to be painted white, it still has mural clouds on it.
The chandelier needs some more light bulbs, and prisms.

The desk.... I have stewed over this the WHOLE time. I think I've finally decided to paint it white, with black trim... stay tuned.

The gap between the bookshelves and the desk will be filled with a post with hooks to hang ALL THOSE CRAZY BAGS ON.

I want to make something like my shabby coat rack.

I know you didn't notice all the bags before, because I took them out of their room to take pictures!

My girls LOVE their bags, so they need a proper home.

The kitchen (that my dad made)

needs a hutchy thing above it... that is still in the planning phases.

That high chair was built by my dad when I was like... I dunno 3 or something.

Again, sorry for the glare, the next picture I take of this will be done in the
evening.

Anyway, the dresser needs drawer pulls, badly.

The green buckets need to be zebra-fied, the black and white bins need labels, cuz I can't even remember what's in which bin.

So not much left to do, right?

It's been a ton of fun to work on and the girls LOVE it!


I'm linking up with: